This is my first How-to. Please shoot on it if it contributes to a better one
Please note that this howto only affects Daikin airconditioning units with WIFI modules.
You have atm 3 sorts of wifi modules on the market. The A41, A42 and the A43. These wifi modules are from Daikin. The versions only affects an extra cable or option print needed for different sorts of units. ( u need to get the right wifi unit fort he applied unit ).
With the help of Mwittig i have managed to get the stuff working ( Thanks again Mwittig! ).
For more info on the commands etc you can visit https://github.com/Apollon77/daikin-controller for all control info.
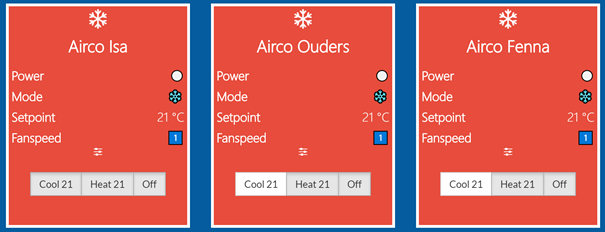
Here is the result showed on my gui in the living room. For example when i press heat21 it changes power on ( black dot ), sun for heating mode.
Then the setup. ( this example shows 1 airconditioning ) you can copy this to as many units you have.
First get the wifi adress of the wifi controller ( you can obtain this easy in the daikin app when you install the wifi controller in the indoor unit ). U need this ip adress for pimatic.
Then you add the following buttons device in pimatic.
{
      "id": "airco-1",
      "name": "Airco 1",
      "class": "ButtonsDevice",
      "buttons": [
        {
          "id": "AircoIsaaanverwarmen",
          "text": "Verwarmen 21"
        },
        {
          "id": "Aircoisaaankoelen",
          "text": "Koelen 21"
        },
        {
          "id": "Aircoisauit",
          "text": "Uit"
}
This gives you the buttons device needed for control. To control these functions i have add the http commands for this in the rules section:
{
      "id": "airco-slaapkamer-isa-aan",
      "name": "airco slaapkamer isa aan koelen",
      "rule": "when Aircoisaaankoelen is pressed then execute \"sudo curl -s 'http://192.168.2.9/aircon/set_control_info?pow=1&mode=3&stemp=21&shum=0&f_rate=3&f_dir=0'\"",
      "active": true,
      "logging": true
    },
    {
      "id": "airco-slaapkamer-isa-uit",
      "name": "Airco slaapkamer isa uit",
      "rule": "when Aircoisauit is pressed then execute \"sudo curl -s 'http://192.168.2.9/aircon/set_control_info?pow=0&mode=3&stemp=21&shum=0&f_rate=3&f_dir=0'\"",
      "active": true,
      "logging": true
    }
Make sure that you replace the IP adress with the ip from your wifi module.
Then make 2 files on your raspi.
- Status1.log
- Temperature1.log ( The wifi can display room temperature, this can add it to pimatic )
Make sure that the files a write enabled for admin with CHMOD.
Now that we have the requested files we need to pull data from the wifi module to these files.
Make a shellsensor device:
{
      "attributeName": "acisa",
      "attributeType": "string",
      "id": "acisa",
      "name": "acisa",
      "class": "ShellSensor",
      "command": "truncate -s 0 /home/status.log & curl -s http://192.168.2.9/aircon/get_control_info -w \"\\n\" >> /home/status.log",
      "interval": 5000
    }
With this device we pull data from the wifi module into the file made on the raspi ( in my case to /home/’filename.log’
You can check if this works in for example putty to check if data is written tot he file with nano or vi.
Then make a logwatcher device named for example ‘statusairco1’ like below. You need logwatcher to make this device. Logwatcher can pull data from a logfile. Make sure the path is ok to your file.
{
      "file": "/home/status.log",
      "attributes": [
        {
          "name": "Power",
          "type": "string",
          "acronym": "Power"
        },
        {
          "name": "mode",
          "type": "string",
          "acronym": "Mode",
          "discrete": true
        },
        {
          "name": "targetTemperature",
          "type": "number",
          "unit": "°C",
          "acronym": "Setpoint"
        },
        {
          "name": "Ventsnelheid",
          "type": "string",
          "discrete": true,
          "acronym": "FanSpeed"
        }
      ],
      "lines": [
        {
          "match": ",pow=1",
          "Power": "⚫️"
        },
        {
          "match": ",pow=0",
          "Power": "⚪️"
        },
        {
          "match": ",mode=[017]",
          "mode": "🚗"
        },
        {
          "match": ",mode=2",
          "mode": "💦"
        },
        {
          "match": "mode=3",
          "mode": "❄️"
        },
        {
          "match": "mode=4",
          "mode": "☀️"
        },
        {
          "match": ",mode=6",
          "mode": "🌪"
        },
        {
          "match": ",stemp=([\\d\\.]+)",
          "targetTemperature": "$1"
        },
        {
          "match": ",f_rate=A",
          "Ventsnelheid": "🚗"
        },
        {
          "match": ",f_rate=B",
          "Ventsnelheid": "💤"
        },
        {
          "match": ",f_rate=3",
          "Ventsnelheid": "1️⃣"
        },
        {
          "match": ",f_rate=4",
          "Ventsnelheid": "2️⃣"
        },
        {
          "match": ",f_rate=5",
          "Ventsnelheid": "3️⃣"
        },
        {
          "match": ",f_rate=6",
          "Ventsnelheid": "4️⃣"
        },
        {
          "match": ",f_rate=7",
          "Ventsnelheid": "5️⃣"
        }
      ],
      "xAttributeOptions": [
        {
          "name": "targetTemperature",
          "displaySparkline": false
        }
      ],
      "id": "daikin",
      "name": "Status Airco Isa",
      "class": "LogWatcher"
    }
Now we can pull the right data from the logfile and display it in pimatic. Since the basic GUI looks a bit messy in my case cause of the many devices needed i have made the gui for it.
An extra is to display the temperature from the wifi module. This is nice add on cause u can display the room temperature without adding a temperature sensor.
You need to make the logfile, like temperature1.log on any directory you want. In my case /home.
You need a shellsensor device:
{
      "attributeName": "isatemp",
      "attributeType": "string",
      "command": "truncate -s 0 /home/pi/temperatuurisa.log && curl -s http://192.168.2.9/aircon/get_sensor_info -w \"\\n\" >> /home/pi/temperatuurisa.log",
      "id": "ruimtetemperatuur-isa",
      "name": "Ruimtetemperatuur isa",
      "class": "ShellSensor",
      "interval": 30000
    }
Now add a logwatcher device to display the data to pimatic:
{
      "file": "/home/pi/temperatuurisa.log",
      "attributes": [
        {
          "name": "Ruimtetemperatuur",
          "type": "number",
          "acronym": "T",
          "unit": "°C",
          "discrete": true
        }
      ],
      "lines": [
        {
          "match": ",htemp=([\\d\\.]+)",
          "Ruimtetemperatuur": "$1"
        }
      ],
      "xAttributeOptions": [
        {
          "name": "Ruimtetemperatuur",
          "displaySparkline": true
        }
      ],
      "id": "Ruimtetemperatuurisa",
      "name": "Slaapkamer Isa Temperatuur",
      "class": "LogWatcher"
    }
When you have any questions feel free to contact me or post a comment below.