
Hey guys!
Today I want to show you my current sensor project. It’s running for some days now and I’m quite satisfied with it.
Some prehistory : i am running a photovoltaic system on my roof and wanted to visualize the difference between the actual pv output and the actual current usage, since my energy meters do not provide these data. My question has been, if there is enough energy to switch more load like washing machine or dryer or better not, to achieve more own consumption.
Since the energy meters of my vendor do not provide any current data, i needed to have some workaround. For that I was looking for a current sensor and found the SCT013. The sensor is clipped to the power line cable and is measuring the magnetic induction and transforming this into analogue low voltage energy. This energy is converted into current data.
Now here are my devices :

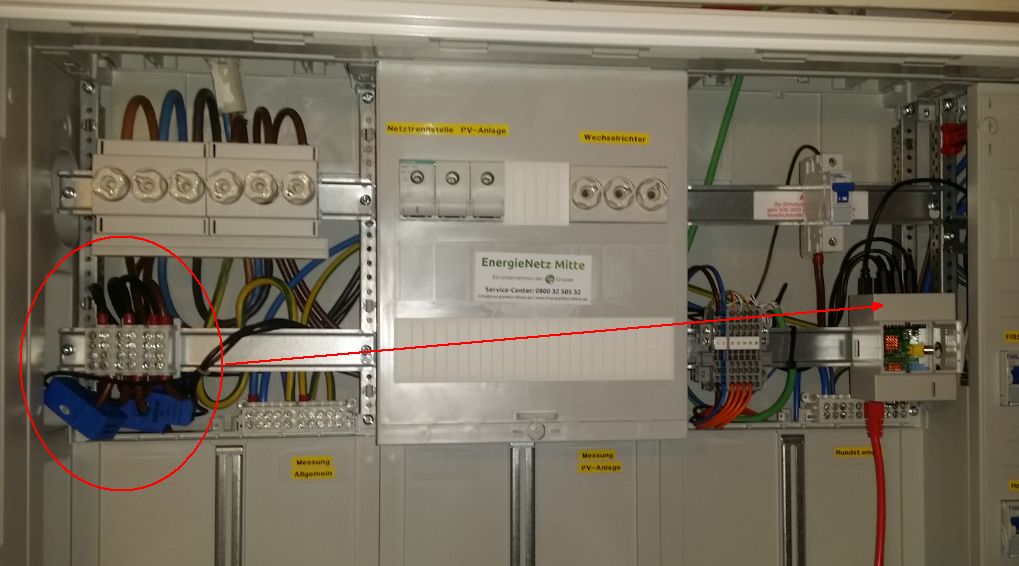
The three SCT013 current sensors are connected each to one phase in the meter enclosure at the basement.

The sensors are connected to a little circuit board which is transfering the SCT013 data into readable serial data. There are several ways to build a sensor board (see links at the bottom), but i choose a ready build solution from the ebay vendor lechacal


The raspberry is running a special image from openenergymonitor.org. This image contains a daemon that is pushing the collected data to the emoncms.org website. For showing the data you will have to create an account to obtain an api key. This key needs to be entered at the /boot/emonhub.conf on the pi. Now restart the emonhub daemon with sudo service emonhub restart
If you installed all correctly, the emoncms.org is collecting the data and will show the input like below :
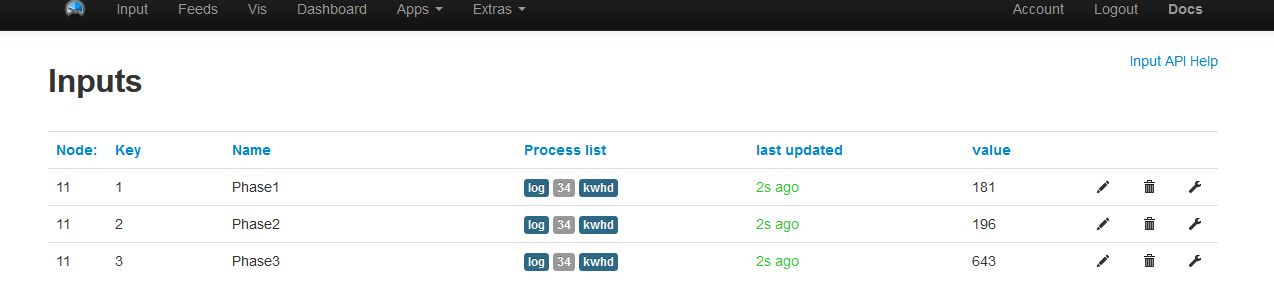
Now you are able to create “Feeds”. These feeds will help to collect and store the input data. I created two feeds for each phase :


The first three feeds are the raw data that’s comming in from the pi for each phase.
The last three feeds are the accumulated kw/h for the day for each phase.
Now that emoncms.org is collecting the data, it’s possible to retrive the actual current data via a simple api call : http://emoncms.org/feed/value.json?id=89762
This will return someting like “544”.
For bringing in these 3 phase data into pimatic, i created three shellsensor devices and deleted the " with a sed command :
    {
      "id": "emon1",
      "name": "Emon Phase 1",
      "class": "ShellSensor",
      "attributeName": "phase1",
      "attributeType": "number",
      "command": "sudo curl -s http://emoncms.org/feed/value.json?id=89762 | sed 's/\\\"//g'",
      "interval": 60000
    },
    {
      "id": "emon2",
      "name": "Emon Phase 2",
      "class": "ShellSensor",
      "attributeName": "phase2",
      "attributeType": "number",
      "command": "sudo curl -s http://emoncms.org/feed/value.json?id=89763 | sed 's/\\\"//g'",
      "interval": 60000
    },
    {
      "id": "emon3",
      "name": "Emon Phase 3",
      "class": "ShellSensor",
      "attributeName": "phase3",
      "attributeType": "number",
      "command": "sudo curl -s http://emoncms.org/feed/value.json?id=89764 | sed 's/\\\"//g'",
      "interval": 60000
    },
now, having the “raw data” in pimatic, i set up a variables device to show it up at the frontend :

    {
      "id": "energiemonitor",
      "class": "VariablesDevice",
      "name": "Energiemonitor",
      "xAttributeOptions": [
        {
          "name": "emon1",
          "displaySparkline": false
        },
        {
          "name": "emon2",
          "displaySparkline": false
        },
        {
          "name": "emon3",
          "displaySparkline": false
        },
        {
          "name": "emon4",
          "displaySparkline": false
        }
      ],
      "variables": [
        {
          "name": "emon4",
          "type": "number",
          "expression": "round (($watt-total * 80) / 100)",
          "unit": "W",
          "label": "Total",
          "acronym": "Total"
        },
        {
          "name": "emon1",
          "type": "number",
          "expression": "round (($emon1.phase1 * 80) / 100)",
          "unit": "W",
          "label": "P1",
          "acronym": "P1"
        },
        {
          "name": "emon2",
          "type": "number",
          "expression": "round (($emon2.phase2 * 80) / 100)",
          "unit": "W",
          "label": "P2",
          "acronym": "P2"
        },
        {
          "name": "emon3",
          "type": "number",
          "expression": "round (($emon3.phase3 * 80) / 100)",
          "unit": "W",
          "label": "P3",
          "acronym": "P3"
        }
      ]
    },
To show the total current from all 3 phases you will have to create a variable (in my case $watt-total).
Now create a rule IF $emon1.phase1 changes or $emon2.phase2 changes or $emon3.phase3 changes THEN $watt-total = $emon1.phase1 + $emon2.phase2 + $emon3.phase3. So you are having the total current for the moment.
At the variables device you can see an offset with 20% at the expression. I set this offset, since i determined a deviation when comparing the emoncms accumulated daily feed with the energy meter data in 24h. You are also able to calibrate the output of the SCT013 sensors by editing the sketch that is loaded to the attiny chip on the PCB from lechacal where the SCT sensors are attached to. I did not do that, since a pimatic offset is more easy to be handled. You don’t have to flash the attiny on and on 'till the correct data is shown.
Since I am getting my actual generated current from the photovoltaics inverter directly into pimatic, I am now able to show the difference between own consuption and generated current. For that i created a DummyPresenceSensor
	{
      "id": "emon-presence",
      "class": "DummyPresenceSensor",
      "name": "Energieüberschuss",
      "autoReset": false
    },

This presence sensor is fed by two rules :
IF every 1 minute and $pvlog.acout - $watt-total > 500 THEN set presence of Energieüberschuss present
And
IF every 1 minute and $pvlog.acout - $watt-total < 500 THEN set presence of Energieüberschuss absent
These rules will set the presence Sensor to full blue if enough energy is provided (more than +500 watt difference) or its only blue circled when the difference between actual pv production and own consumption is less than +500 watt. I choose an offset of 500 watt just to be sure to have a buffer. The readings from the SCT013 are not always correct because of phase shifting and other electrical issues.
If you want to, you can also show the daily energy consumption at pimatic (see above picture “FEEDS”). For that, you will have to create three more shellsensors and another variables device similar to the above examples. Another variable for the total 24h consumption needs to be created too (in my case $watt24-total) and a rule for that.
    {
      "id": "emonw1",
      "name": "Emon 24h Phase 1",
      "class": "ShellSensor",
      "attributeName": "phase1",
      "attributeType": "number",
      "command": "sudo curl -s http://emoncms.org/feed/value.json?id=89766 | sed 's/\\\"//g'",
      "interval": 60000
    },
    {
      "id": "emonw2",
      "name": "Emon 24h Phase 2",
      "class": "ShellSensor",
      "attributeName": "phase2",
      "attributeType": "number",
      "command": "sudo curl -s http://emoncms.org/feed/value.json?id=89767 | sed 's/\\\"//g'",
      "interval": 60000
    },
    {
      "id": "emonw3",
      "name": "Emon 24h Phase 3",
      "class": "ShellSensor",
      "attributeName": "phase3",
      "attributeType": "number",
      "command": "sudo curl -s http://emoncms.org/feed/value.json?id=89768 | sed 's/\\\"//g'",
      "interval": 60000
    },
and here the variables device

    {
      "id": "energiemonitor-24",
      "class": "VariablesDevice",
      "name": "Energiemonitor 24h",
      "xAttributeOptions": [
        {
          "name": "emon24-1",
          "displaySparkline": false
        },
        {
          "name": "emon24-2",
          "displaySparkline": false
        },
        {
          "name": "emon24-3",
          "displaySparkline": false
        },
        {
          "name": "emon24-4",
          "displaySparkline": false
        }
      ],
      "variables": [
        {
          "name": "emon24-4",
          "type": "number",
          "expression": "($watt24-total * 80) / 100",
          "unit": "kWh",
          "label": "Total",
          "acronym": "Total"
        },
        {
          "name": "emon24-1",
          "type": "number",
          "expression": "($emonw1.phase1 * 80) / 100",
          "unit": "kWh",
          "label": "P1",
          "acronym": "P1"
        },
        {
          "name": "emon24-2",
          "type": "number",
          "expression": "($emonw2.phase2 * 80) / 100",
          "unit": "kWh",
          "label": "P2",
          "acronym": "P2"
        },
        {
          "name": "emon24-3",
          "type": "number",
          "expression": "($emonw3.phase3 * 80) / 100",
          "unit": "kWh",
          "label": "P3",
          "acronym": "P3"
        }
      ]
    },
Here’s the rule for accumulating the 3 phases for a daily consumption : IF $emonw1.phase1 changes or $emonw2.phase2 changes or $emonw3.phase3 changes THEN $watt24-total = $emonw1.phase1 + $emonw2.phase2 + $emonw3.phase3
You see, it’s the same as the above device … just without the DummyPresenceSensor
Here you can also see the 20% offset. You will have to see for yourself what offset is reasonable for yourself. Usually you need to calibrate the SCT013 via the sketch that’s uploaded at the attiny on on the PCB. For that it’s necessary to change the calibration coef. But as stated above I found it more easier to have the offset directly within pimatic.
Hope all these information will help you to reverse engineer. If there are any questions don’t hesitate to ask!!
Cheers
Lead
Here are some helpful links I collected for my project :
Attiny85 Sketch for converting the SCT013 input into serial data
http://lechacal.com/RPICT/3CT/rpi_3CT_v1_1.ino
General information from lechacal for the PCB and SCT013 sensor
http://lechacal.com/wiki/index.php/Raspberrypi_Current_and_Temperature_Sensor_Adaptor
SCT013 and Arduino Basics
http://openenergymonitor.org/emon/buildingblocks/ct-sensors-interface
Build your own hardware
http://openenergymonitor.org/emon/buildingblocks/how-to-build-an-arduino-energy-monitor-measuring-current-only
Remark :
It could be that the emoncms.org database is not receiving any data since the serial baudrate is not set correctly. If this happens, I am using minicom to check if there is any serial output with the command sudo minicom -D /dev/ttyAMA0 -b9600. After that, eitherall is ok or restart the emonhub daemon again. the serial interface for emonhub is a little unstable. but once running all is well ")
")


