
At this point we will go over and fill Pimatic with some life.
It’s important to know how to insert and edit Pimatic devices since they are the most important thing about pimatic. without device no action!
At first device I suggest you’ll install the weather plugin and create the weather device for your location.
There are two possibilities to install a plugin.
1.) Use the Plugin menu.*
For that, you’ll have to go to the main menu (upper left button), then click on Plugins and at the bottom on “Install new Plugin”.
Search the list for the weather plugin and click on + at the right

Go back and hit the restart button on the upper right corner.
Pimatic will start over and install the selected weather plugin.
or 2.) Insert Plugin directly to the config.json
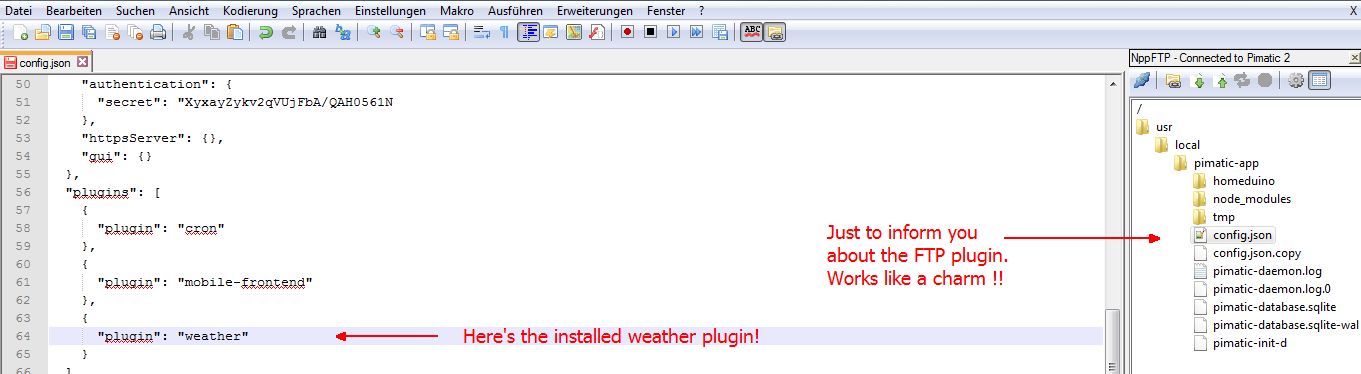
The other way to install a plugin is to insert it directly at the plugin section of the config.json directly (have a look at the picture below, there you can see the weather plugin at the plugin section).
For editing, Pimatic must be stopped first via “sudo service pimatic stop”.
After the Plugin is installed, we have to edit the config.json at the pimatic directory. But the first of all, stop the pimatic service before editing the config.json (remember to always stop Pimatic before editing config files).
I preferr to edit with Notepad++ from my Windows Notebook but you can also use Nano, Vi or any other editor you like.
I’m not explaining Notepad++ since there are enough tuts for that, but I recommend to use the FTP Plugin, so you can easily connect to your Pi / Linux system via FTP (when ftp-daemon is installed) and load/edit files directly.
Well now load the config.json to your editor. At the plugin section you will see the recently installed weather plugin :
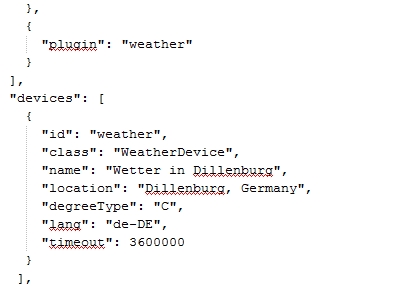
Now go ahead to the devices section, this is still empty and looks like this :"devices": [],
Insert the following code to install your first device (change the name and location and maybe the language if needed!) :
    {
      "id": "weather",
      "class": "WeatherDevice",
      "name": "Wetter in Dillenburg",
      "location": "Dillenburg, Germany",
      "degreeType": "C",
      "lang": "de-DE",
      "timeout": 3600000
    }
your config will look like that now :
save your config.json and restart pimatic.
No we’re ready to insert our first device to the Pimatic GUI.
Remember this nice picture here?

Click on the edit button and then “Add item”

Now click the + button at the right and then the back button at the upper left.

Your device was added to the Favourites page. You can now edit the Favourites if you want to.

I decided to rename the Favourites page, so I clicked on “Edit Pages” :

Here I rename Favourites in Weather. Please note, that the ID stays the same when editing existing pages.
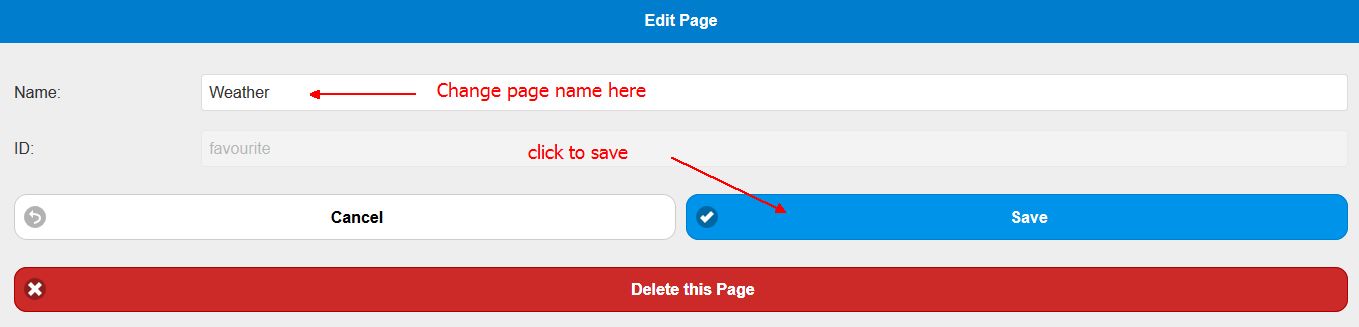
Here you are able to delete the page.
Besides, a deletion of a page can also be done via drag and drop :

Now go back to the to the main screen (back button upper left then hook upper right) and voila :

There’s your first device 
Now it’s time to learn more about Step 4 - Homeduino : RF receiving and transmitting