Received my pirs today and testing now ") Working great so far.
Working great so far.

Show your hardware
Received my pirs today and testing now Working great so far.
@sweebee If your testing is complete please share your codes i can use it for my next project.
Yesterday i order all the components for my first home made wireless temp sensor. if i have the it al working i will make some photos to share.
@Sjeff Its working great. Can’t tell much about the battery life  But from my calculations it should run for more than a year, maybe 2 years with 2 aa batteries.
Scheme:

code:
// KlikAanKlikUit PIR sensor
// Based on AttinyX5
// Author: Wiebe Nieuwenhuis
//
//                  +-\/-+
//                 1|o   |8  Vcc
//      433Mhz TX  2|    |7
//     PIR sensor  3|    |6
//            GND  4|    |5
//                  +----+

#include <avr/sleep.h>
#include <avr/power.h>
#include <NewRemoteTransmitter.h>

int ID = 123;          // KAKU address

const byte txPin = 3;  // pin 2   | 433Mhz TX pin
const byte inPin = 4;  // pin 3   | PIR sensor pin

boolean input = false;
boolean state  = false;

NewRemoteTransmitter transmitter(ID, txPin, 260, 3); // Set-up transmitter

ISR (PCINT0_vect) {
  // do something interesting here
}

void setup () {

  pinMode (txPin, OUTPUT);
  pinMode (inPin, INPUT);
  digitalWrite (inPin, HIGH);  // internal pull-up

  // pin change interrupt (example for D4)
  PCMSK  |= bit (PCINT4);  // want pin D4 / pin 3
  GIFR   |= bit (PCIF);    // clear any outstanding interrupts
  GIMSK  |= bit (PCIE);    // enable pin change interrupts

}

void loop () {

  input = digitalRead(inPin);   // read the input pin

  if(input == true && state == false) {
       transmitter.sendUnit(1, true);
       state = true;
  }

  if(input == false && state == true) {
       transmitter.sendUnit(1, false);
       state = false;
  }

  delay (10);
  goToSleep ();

}

// SLEEP FUNCTION
void goToSleep () {
  set_sleep_mode(SLEEP_MODE_PWR_DOWN);
  ADCSRA = 0;            // turn off ADC
  power_all_disable ();  // power off ADC, Timer 0 and 1, serial interface
  sleep_enable();
  sleep_cpu();
  sleep_disable();
  power_all_enable();    // power everything back on
}
@sweebee thanks for sharing.
I hope our Chinese friends will do a super fast shipping this time ")
Hi @sweebee. Thanks for sharing code. Can you help me where to find the rest of code like NewRemoteTransmitter.h? Do we have any detail tutorial?
BR, Michal
@misakm You need this library: https://github.com/hjgode/homewatch/tree/master/arduino/libraries/NewRemoteSwitch
I will post all my sketches here: https://github.com/sweebee/Arduino-home-automation
I dont want to interrupt your PIR-discussion, but I got some hardware to show:
Its not an ambilight so every LED is the same color but in my opinion the speakers on the top look pretty cool
With hindsight the 60 LEDs/meter were a bit too much, normally i power them like around 40%.

Hi,
I have tested you pir program. Look that homedruino does not recognize protocol
debug [pimatic-homeduino]: received: [ 2160, 10661, 17164 ] 0001000100010001000100010001000100010100010001000100000100010001010000010001010000010001000100010001000100010100000100010001010002
19:05:13debug [pimatic-homeduino]: data: "RF receive 2160 10661 17164 0 0 0 0 0 0001000100010001000100010001000100010100010001000100000100010001010000010001010000010001000100010001000100010100000100010001010002"
Please help
Michal
@misakm
please don’t hijack - the threat is called show your hardware
just a short answer (if it doesn’t help open a new threat please!!)
try to burn the arduino ide bootloader and upload the script again.
had similar issues on that and this is how i solved it!
and pls remember if doesn’t help open a new threat
pimatic v0.9 has been released!
Support Pimatic and get some free stickers
Like us on Facebook
make it so !
My pir almost finished. Waiting for my enclosures from aliexpress.


@misakm Try to get the 1Mhz also working if your using it with batteries, it uses less energy.
@sweebee
1 Mhz not working for me - protocol not recognized. I would be appreciated if you can write totorial
Michal
1Mhz is working fine here. I will write a tutorial soon how I did it and how its working for me.
Made myself a moodlight with the NRF24 chip.
Hardware:
Ikea Fado
Neopixel ring 16
Arduino Pro Mini 3.3v
NRF24
Looks very nice  https://www.youtube.com/watch?v=eJSG8-6Ldng
@skipper79 This is correct:

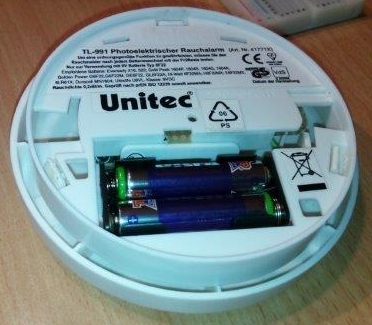
Here my first battery powerd PIR . I used the housing of a smoke detector. The diameter of the speaker fits perfect for the PIR 
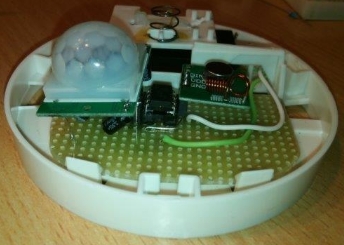

Right now I’m using it to turn on the wifi on the 1st floor.
if PIR is present and my_smartphone is present
then turn WLAN oben on for 20 minutes
@magic-tune said:
Here my first battery powerd PIR . I used the housing of a smoke detector. The diameter of the speaker fits perfect for the PIR
Nice idea! Very good job. Thanks for this inspiration!
but
It looks like you removed the electronics of the smoke detector. Next step, leave it in - add the attiny with PIR - send status of PIR AND status of smoke detector to pimatic - Voila, your own fire alarm system