
@noxx
But ESPEasy does not send the data itself. Just when changing.
What happens if you use: http://192.168.1.226/control?cmd=GPIO,5,1 ?
-
ESPeasy - add a relay
Pimatic = Smart Home
-
@wutu said:
that works…
/espeasy01/Beleuchtung_1/state 1.00
/espeasy01/Beleuchtung_1/state 0.00but only with
mosquitto_sub -v -t /#here with both states, but both show the same output
pi@raspberrypi:~ $ mosquitto_sub -d -t /espeasy01/gpio/5 Client mosqsub/19406-raspberry sending CONNECT Client mosqsub/19406-raspberry received CONNACK Client mosqsub/19406-raspberry sending SUBSCRIBE (Mid: 1, Topic: /espeasy01/gpio/5, QoS: 0) Client mosqsub/19406-raspberry received SUBACK Subscribed (mid: 1): 0 ^C pi@raspberrypi:~ $ mosquitto_sub -d -t /espeasy01/gpio/5 Client mosqsub/19407-raspberry sending CONNECT Client mosqsub/19407-raspberry received CONNACK Client mosqsub/19407-raspberry sending SUBSCRIBE (Mid: 1, Topic: /espeasy01/gpio/5, QoS: 0) Client mosqsub/19407-raspberry received SUBACK Subscribed (mid: 1): 0 ^C -
Yes, your topic is now
/espeasy01/Beleuchtung_1/statebecause you changed it in the configuration ESPEasy.{ "class": "MqttSwitch", "id": "switch", "name": "Switch", "topic": "/espeasy01/Beleuchtung_1/state", "onMessage": "1.00", "offMessage": "0.00" }Pimatic = Smart Home
-
hmmm…
thx, with this code i cant switch the GPIO, nothing happens
But, if i change the GPIO with
http://192.168.1.226/control?cmd=GPIO,5,0
http://192.168.1.226/control?cmd=GPIO,5,1Pimatic change the state from on->off->on…
-
@noxx Ok, hang on, I simulate it with R78.
Pimatic = Smart Home
-
@wutu said:
@noxx Ok, hang on, I simulate it with R78.
")
i have it now.
this was the right settings:
    {
      "class": "MqttSwitch",
      "id": "switch",
      "name": "ESPEASY_GP5",
      "topic": "/espeasy01/gpio/5",
      "stateTopic": "/espeasy01/Beleuchtung_1/state",
      "onMessage": "1.00",
      "offMessage": "0.00"
    }
with this espeasy works and i see the state changes in pimatic
regard
-
@noxx Nicely took advantage of a stateTopic
R78 has bug about this. Since version R80 you can use a single topic.
I use the dev version only. R78 has around MQTT more bugs.
For example, here I am, one Reported: http://www.esp8266.nu/forum/viewtopic.php?f=6&t=1048Pimatic = Smart Home
-
@wutu said:
R9
i update to R94
pi@raspberrypi:~ $ mosquitto_sub -v -t /# /espeasy01/system/uptime 1.00 /espeasy01/system/freeram 27416.00 /espeasy01/gpio/5 1.00 /espeasy01/Beleuchtung_1/state 1.00 /espeasy01/system/uptime 1.00 /espeasy01/gpio/5 0.00 /espeasy01/Beleuchtung_1/state 0.00 /espeasy01/system/freeram 27376.00 /espeasy01/system/uptime 1.00 /espeasy01/system/freeram 27416.00 /espeasy01/system/uptime 1.00 /espeasy01/system/freeram 27416.00 /espeasy01/gpio/5 1.00 /espeasy01/Beleuchtung_1/state 1.00 /espeasy01/gpio/5 0.00 /espeasy01/Beleuchtung_1/state 0.00 /espeasy01/system/uptime 1.00 /espeasy01/system/freeram 27416.00 -
but with R94 i have the same problem
works, pimatic can switch the GPIO and show the correct
state if i switch with my browser{ "class": "MqttSwitch", "id": "switch", "name": "ESPEASY_GP5", "topic": "/espeasy01/gpio/5", "stateTopic": "/espeasy01/Beleuchtung_1/state", "onMessage": "1", "offMessage": "0" }with this, pimatic can switch but i dont the new state
if i switch my browser{ "class": "MqttSwitch", "id": "switch", "name": "ESPEASY_GP5", "topic": "/espeasy01/gpio/5", "onMessage": "1", "offMessage": "0" }with this here, pimatic cant switch, but i see the correct state
if i switch with my browser{ "class": "MqttSwitch", "id": "switch", "name": "ESPEASY_GP5", "topic": "/espeasy01/Beleuchtung_1/state", "onMessage": "1.00", "offMessage": "0.00" } -
Works for me with R78 and following config,
i’m using a module likr this
https://github.com/JanGoe/esp8266-wifi-relaymy input switch was connecting between gnd and gpio12 pin
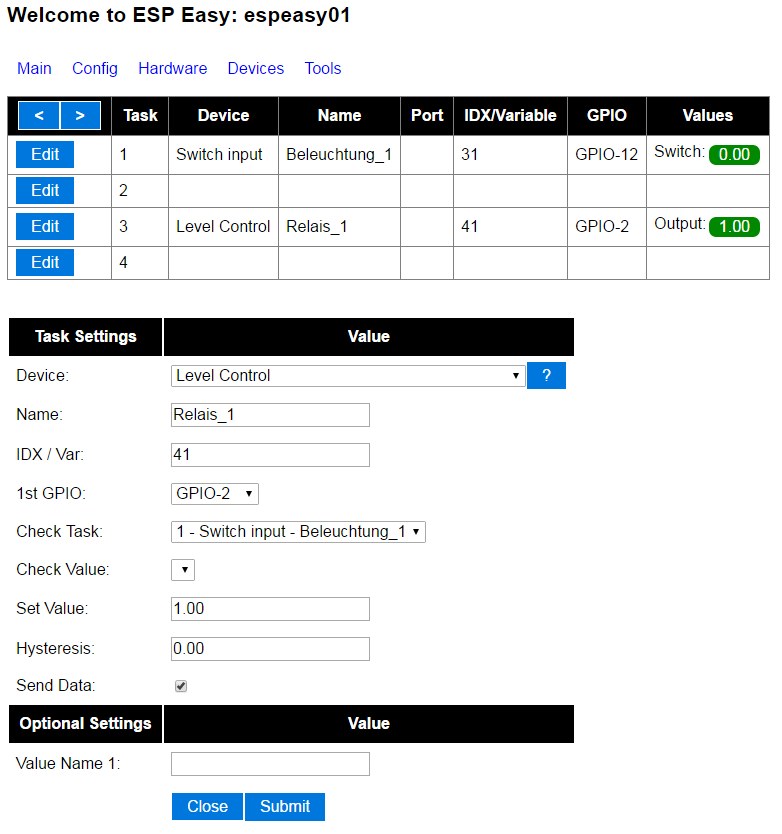
the output relais was working on gpio2{ "class": "MqttSwitch", "id": "switch", "name": "ESPEASY_GP5", "topic": "/espeasy01/gpio/2", "stateTopic": "/espeasy01/Beleuchtung_1/Switch", "onMessage": "1.00", "offMessage": "0.00" }so i`ve create a switch-imput for reading gpio12…
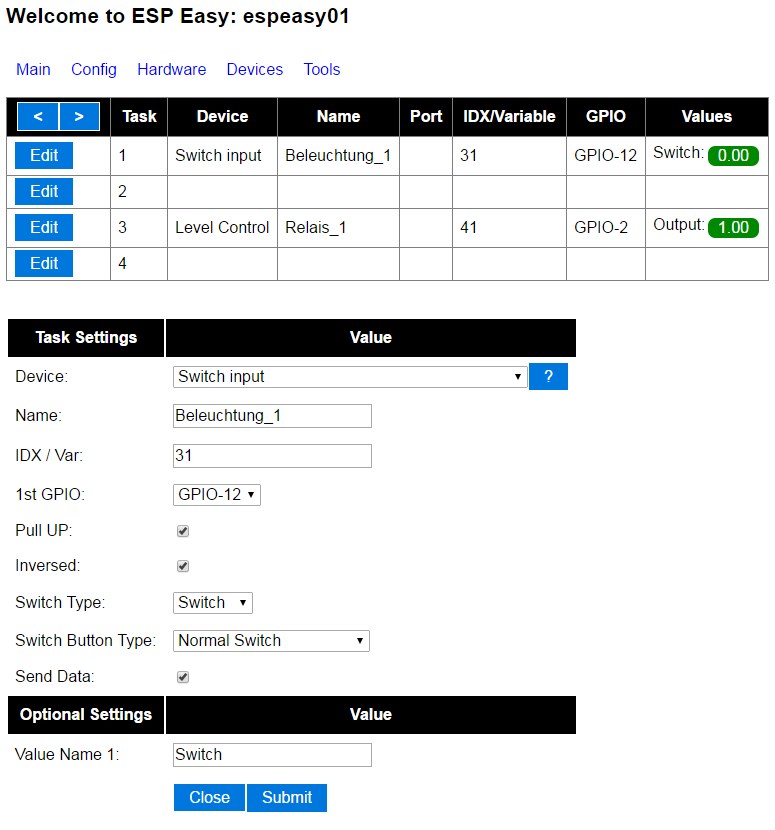
…and a Level Control output for writing the gpio2
on/off log of mqtt-broker
/espeasy01/Beleuchtung_1/Switch 1.00 /espeasy01/Relais_1/Output 0.00 /espeasy01/Beleuchtung_1/Switch 0.00 /espeasy01/Relais_1/Output 1.00ESPEasy Log
SW : State 1 Out : State 0 SW : State 0 Out : State 1maybe i have to invert the gpio states, but my relais was switching
-
thx, but i dont understand the part with LEVEL CONTROL
if i use this code, all works fine:
{ "class": "MqttSwitch", "id": "switch", "name": "ESPEASY_GP5", "topic": "/espeasy01/gpio/5", "stateTopic": "/espeasy01/Beleuchtung_1/state", "onMessage": "1", "offMessage": "0" } -
LevenControl is for my local connected switch
he check if the SwitchInput Task gets 0 or 1 and set gpio2 high or lowmy problem now was a inverted control in pimatic… maybe by directly control gpio2 by
"topic": "/espeasy01/gpio/5",@wutu is it possible to control the gpio via the LevelControl device-string and not directly or add a function like #180@pimatic-gpio??
-
Hi @xCite86,
Look for a new feature “Rules” in ESPEasy (from R86 above).
(Also manages: Remote sensors also create event for rules from R87)
Look here: http://www.esp8266.nu/forum/viewtopic.php?f=5&t=721&hilit=rules&start=80Pimatic = Smart Home
-
-
@xCite86
It is to be enabled in Tools> AdvancedPimatic = Smart Home
-
@wutu veeeeeryyyy nice, much thx… works like a charm
i have invert the switch On/OffMessage
    {
      "class": "MqttSwitch",
      "id": "switch_az",
      "name": "Arbeitszimmer",
      "topic": "/switch_az/gpio/2",
      "stateTopic": "/switch_az/Switch_1/Switch",
      "onMessage": "0",
      "offMessage": "1"
    },
this settings

and a little rule
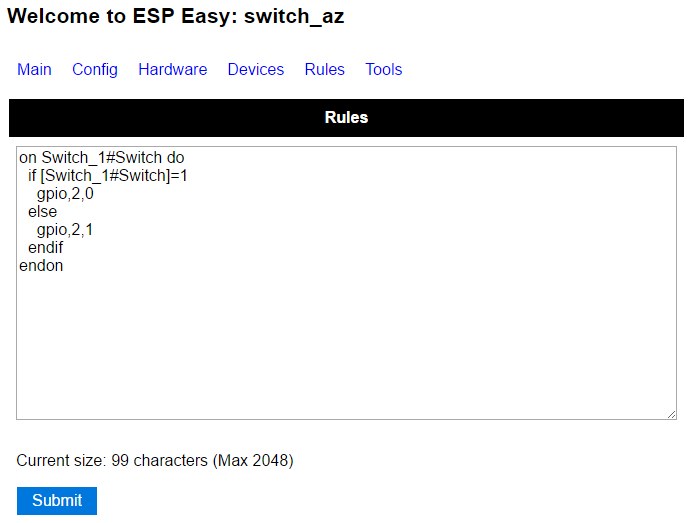
on Switch_1#Switch do
  if [Switch_1#Switch]=1
    gpio,2,0
  else
    gpio,2,1
  endif
endon
…and now i`m hope the R95 was stable ^^
-
now i have 2 ESPEasy-devices with R95 in my network…
but i lost very often the connection to the broker.
Log
476501 : SW : GPIO 2 Set to 0
476593 : SW : GPIO 2 Set to 0
487299 : WD : Uptime 8 ConnectFailures 27 FreeMem 27528
487299 : MQTT : Connection lost
488325 : MQTT : Connected to broker
488332 : Subscribed to: /switch_sz/#
517300 : WD : Uptime 8 ConnectFailures 29 FreeMem 27528
517300 : MQTT : Connection lost
518318 : MQTT : Connected to broker
518325 : Subscribed to: /switch_sz/#
it seems they have the same Client-Names “ESPClient0”
pi@raspberrypi:~ $ mosquitto
1459520003: mosquitto version 1.3.4 (build date 2014-08-22 06:10:51+0000) starting
1459520003: Using default config.
1459520003: Opening ipv4 listen socket on port 1883.
1459520003: Opening ipv6 listen socket on port 1883.
1459520006: New connection from 192.168.0.33 on port 1883.
1459520006: New client connected from 192.168.0.33 as ESPClient0 (c1, k15).
1459520007: New connection from 127.0.0.1 on port 1883.
1459520007: New client connected from 127.0.0.1 as pimatic_2e6a6fa9 (c1, k180).
1459520016: New connection from 192.168.0.34 on port 1883.
1459520016: Client ESPClient0 already connected, closing old connection.
1459520016: New client connected from 192.168.0.34 as ESPClient0 (c1, k15).
1459520036: New connection from 192.168.0.33 on port 1883.
1459520036: Client ESPClient0 already connected, closing old connection.
1459520036: New client connected from 192.168.0.33 as ESPClient0 (c1, k15).
1459520047: New connection from 192.168.0.34 on port 1883.
1459520047: Client ESPClient0 already connected, closing old connection.
1459520047: New client connected from 192.168.0.34 as ESPClient0 (c1, k15).
where i could configure that name??
-
Only Unit nr:
On the Config page. The result is ESPClient + Unit nr.Pimatic = Smart Home
-
thanks, works well
pi@raspberrypi:~ $ mosquitto 1459595937: mosquitto version 1.3.4 (build date 2014-08-22 06:10:51+0000) starting 1459595937: Using default config. 1459595937: Opening ipv4 listen socket on port 1883. 1459595937: Opening ipv6 listen socket on port 1883. 1459595941: New connection from 127.0.0.1 on port 1883. 1459595941: New client connected from 127.0.0.1 as pimatic_90afb63f (c1, k180). 1459595952: New connection from 192.168.0.34 on port 1883. 1459595952: New client connected from 192.168.0.34 as ESPClient2 (c1, k15). 1459595955: New connection from 192.168.0.33 on port 1883. 1459595955: New client connected from 192.168.0.33 as ESPClient1 (c1, k15). 1459595958: New connection from 192.168.0.38 on port 1883. 1459595958: New client connected from 192.168.0.38 as ESPClient3 (c1, k15). -
@noxx @xCite86
I finally had time to test it. Configuration is unnecessarily complex. It is due to change default topic.
If you use a device name: “gpio” and Value name as GPIO numbers.
It works with one topic.{ "class": "MqttSwitch", "id": "switch_az", "name": "Arbeitszimmer", "topic": "/switch_az/gpio/2", "onMessage": "0", "offMessage": "1" }EDIT:
If you do not need to change the basic parameters of the actuator. It is not necessary to configure ESPEasy at all. Immediately after flash, everything works.
Topics can be derived from http commands.http://<ESP IP address>/control?cmd=GPIO,<pin>,0 == topic: /sysname/gpio/2 message:0/1 (0.00/1.00 for R78)
http://<ESP IP address>/control?cmd=PWM,<pin>,<level> == topic: /sysname/pwm/<pin> message: <level>
http://<ESP IP address>/control?cmd=pcapwm,<pin>,<Level> == topic: /sysname/pcapwm/<pin> message: 0-4095
And so onPimatic = Smart Home